Domain Creation in Linux by Command Prompt.
open cmd prompt.
Navigate to weblogic_home/common/bin> ./config.sh
For Linux config file :Config.sh
Creation of new Domain
New Domain Configuration Wizards shows create a new weblogic domain and Extend an existing domain.
Type 1 and press Enter
Type 1 and press Enter
Type "Next" and Enter
Type "Next" and Enter
Enter User Password and its Encrypted and press enter
Shows updated user password as *****
Type 3 and press enter for confirmation of user password.
Shows updated confirm user password as **** and press enter
Shows Domain Mode Configuration as 1.Development Mode, 2.Production Mode
Here we are going to select 2.Production Mode and press enter
For default it takes JRockit SDK 1.6.0 for Production mode.
Type "Next" and press enter
Type "Next" and press enter
Here shows Target location of new domain creation. type "Next" and press enter
Enter new name for the domain eg : linux_domain and press enter
New domain has been updated and press enter.
Domain Created Successfully.
Starting Administration Server
Navigate to new domain \linux_domain\bincommand : startWeblogic.sh
press enter
Needs to create Boot.properties file at
domain_home/servers/Adminserver/security
If you don't have any security folder and create
a folder.
Here to make a directory for security : mkdir security
To create boot.properties.
After click on I ( insertmode)
Then give username=weblogic
Password
=weblogic1
Click on ESC
Then give Wq!
Navigate to security folder and boot.properties present.
open boot.properties and its shows user name and password for the domain.
How to run admin server in the background
service.
Navigate to domain_home/bin> nohup
./startWeblogic.sh & and press enter.
Now Administration server is in Running Mode.
Creation of Managed Server.
Open Admin server console : 192.168.1.8:7001/consoleIn the Domain structure expand plus symbol and click sever and new.
Enter new managed sever details such as Name, Listen address and Listen port.
Click "Next"
Here show the summary of new managed server and click "Finish"
Shows new managed server "ms1" in "Unknown" state
Creation of Machine
Click machine in domain structure.
Click "New"
Enter new machine name as "m1" and select Machine OS as "Unix" and click ok.
New machine has been successfully created.
Open newly created machine(m1) and click node manager and enter listen address.
Click on Save button.
Here to assign the managed server to machine.
Shows managed sever assigned to machine.
Here its shows Node manager is "Inactive".so needs to start node manager service.
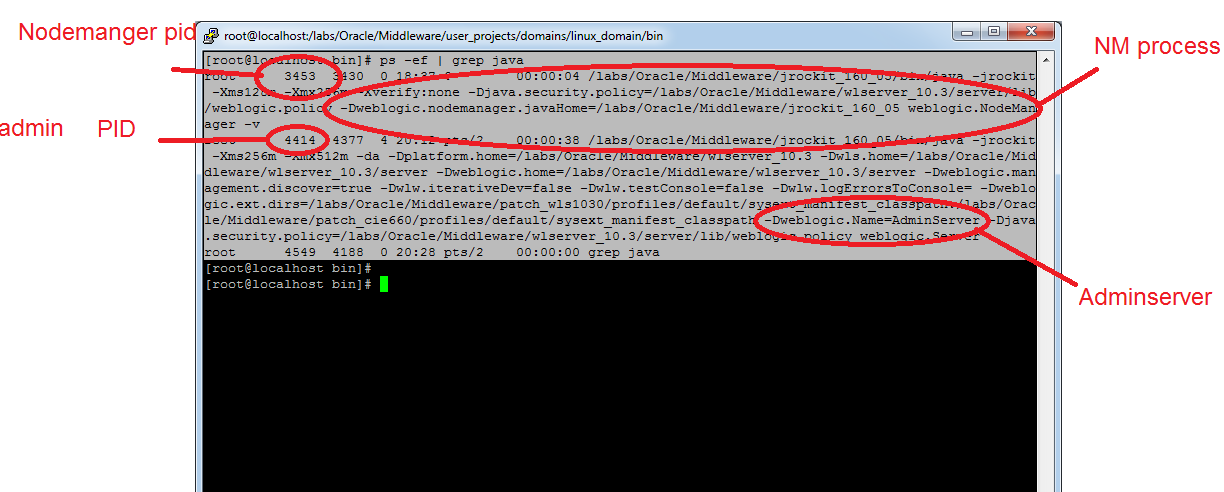
Here we are checking if any existing nodemanger.
To kill the process we can use kill -9 pid
Here shows the Nodemanager PID, admin PID and nodemanager process
To kill node manger we have to use kill -9
3453
After killing the nodemanager
Start the nodemanger as background service
.
Navigate to weblogic_home/server/bin>
nohup ./startNodemagner.sh &
Now monitor the nodemanger in admin console.
When you see the ssl exception we need to
do additional settings
Navigate to adminserveràconfiguration à sslà advancedà
Make hostnameverification as “none”
It’s need adminserver restart
All changes
have been activated. However 1 items must be restarted for the changes to take
effect.
How to
restart adminserver.
After
kill the admin server start it again.
Now the nodemanager is "Reachable" state.
Now try to start the managed server.
Managed server(ms1) is in "Running" Successfully.


No comments:
Post a Comment